I tried this method to allow eMule to connect to the ed2k server and show a High ID using a cloud server with a public IP. However, it does not work for the KAD network, because KAD uses UDP traffic, and this method cannot handle UDP connections.
The problem started when I needed to share some operating system images via eMule. But I found that my eMule client could only download from others and could not share with anyone else. This is because my eMule client showed a low ID. Low ID users can hardly share files with each other via P2P. The KAD network status was also Firewalled, making sharing files through eMule almost impossible.
eD2K Network
Status: Connected
IP:Port:    xxxxxx:4662
ID: xxxx
    Low ID

eD2K Server
Name:   eMule Security
Description:    www.emule-security.org
IP:Port:    45.82.80.155:5687
Version:    17.15
Users:  42,340
Files:  24,855,474
Connections:    Obfuscated


Kad Network
Status: Firewalled
UDP Status: Firewalled
IP:Port:    xxxxxxxxxxx:4672
ID: 3746615776
Extern UDP Port:    9060
Buddy:  None
Many home networks nowadays are behind NAT and do not have a dedicated public IP. The ISP implements an additional layer of NAT, making you share a single public IP with hundreds of others. Your home router also performs another layer of NAT. As a result, the external internet has no way of locating your computer. Even if you set up port forwarding on your home router, the data cannot get through the ISP’s layer if you don’t have a public IP.
But I have a cloud server, which has a public IP. After testing the installation of eMule on the cloud server, I found that the ed2k server shows a high ID, and all the KAD nodes status are open, with no restrictions at all.
eD2K Network
Status: Connected
IP:Port:    xxxxxx:4662
ID: xxxx
    High ID

Kad Network
Status: Opened
UDP Status: Opened
IP:Port:    xxxxxxxxxx:4672
To take advantage of this, you can use the local eMule client to achieve a high ID with the help of the cloud server's public IP.
First, you need to use frp for reverse proxy to allow external UDP and TCP traffic to enter the local eMule client.
First, download frp on the cloud server. The GitHub address for frp is:https://github.com/fatedier/frp/releases
After downloading, unzip it, and edit frps.toml in the frp directory
bindPort = 7000               # port for frp clients to connect

# Allow ports 4662 (for eMule TCP) & 4672 (for eMule UDP) to be used by clients
allowPorts = [
  { start = 4662, end = 4672 }
]

# Optional: authentication
auth.method = "token"
auth.token = "your_strong_token"
Run later
./frps.exe -c frps.toml
[1;34m2026-02-12 23:59:23.951 [I] [frps/root.go:115] frps uses config file: frps.toml
[0m[1;34m2026-02-12 23:59:24.542 [I] [server/service.go:248] frps tcp listen on 0.0.0.0:7000
[0m[1;34m2026-02-12 23:59:24.551 [I] [frps/root.go:124] frps started successfully
On the local host, you also need to download and extract frp in the same way, and edit frpc.toml in the frp directory.
serverAddr = "your_vps_public_ip"
serverPort = 7000
auth.token = "your_strong_token"

[[proxies]]
name = "emule_tcp"
type = "tcp"
localIP = "127.0.0.1"
localPort = 4662       # must match eMule TCP listening port
remotePort = 4662      # public port on VPS

[[proxies]]
name = "emule_udp"
type = "udp"
localIP = "127.0.0.1"
localPort = 4672       # must match eMule UDP listening port
remotePort = 4672      # public port on VPS
Then run the client
./frpc.exe -c frpc.toml

?[1;34m2026-02-12 08:00:04.627 [I] [sub/root.go:159] start frpc service for config file [frpc.toml]
?[0m?[1;34m2026-02-12 08:00:04.630 [I] [client/service.go:335] try to connect to server...
?[0m?[1;34m2026-02-12 08:00:04.974 [I] [client/service.go:327] [80eca7b7ad12f5db] login to server success, get run id [80eca7b7ad12f5db]
?[0m?[1;34m2026-02-12 08:00:04.976 [I] [proxy/proxy_manager.go:180] [80eca7b7ad12f5db] proxy added: [emule_tcp emule_udp]
?[0m?[1;34m2026-02-12 08:00:05.074 [I] [client/control.go:172] [80eca7b7ad12f5db] [emule_tcp] start proxy success
?[0m?[1;34m2026-02-12 08:00:05.075 [I] [client/control.go:172] [80eca7b7ad12f5db] [emule_udp] start proxy success
?[0m?[1;34m2026-02-12 08:00:05.560 [I] [proxy/udp.go:93] [80eca7b7ad12f5db] [emule_udp] incoming a new work connection for udp proxy, xxxxxxxxx:7000
?[0m
This achieves reverse proxying. We need to make some configurations in eMule:
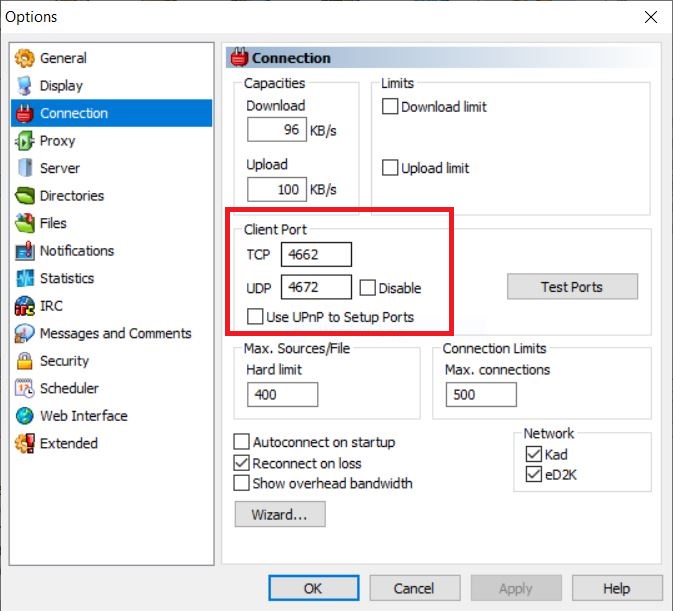
Open eMule → Options → Connection.
Set TCP port to 4662, UDP port to 4672.(Use the same ports as in frpc config.)
Disable UPnP – we are handling forwarding manually.
However, after such a configuration, connecting to the ed2k server still cannot show highid. Moreover, the displayed address is still the local eMule's NAT public IP, not the cloud host's public IP, because the cloud host forwards the public port to it, but it does not initiate requests through the cloud host. We still need to use 3proxy to implement forward proxy.
We need to download and install 3proxy on the cloud host. The GitHub address for 3proxy is:https://github.com/3proxy/3proxy/releases/
After downloading, unzip it, and create and edit a config.cfg file in the 3proxy directory.
# Declare that this is a service configuration, and 3proxy will run in daemon mode
service

# DNS server settings, using Google's public DNS
# The proxy will resolve domain names through here
nserver 8.8.8.8
nserver 8.8.4.4

# External network card binding address
# 0.0.0.0 means listening on all network interfaces
# All IP addresses on the server can be used
external 0.0.0.0

# Bind address to internal network card
# Also listen on all interfaces
internal 0.0.0.0

# Enable strong authentication
auth strong
# Add user: username:CL:password
users Tom:CL:fdT3G5YDdge

# Start SOCKS5 proxy service
# -p1080 listens on port 1080
# Both SOCKS4 and SOCKS5 are supported
socks -p1080

# Access Control: Allow All
# * Wildcard, any IP can connect
allow *
Go to the 3proxy/bin64 directory and use the config.cfg file to start 3proxy with cmd.
bin64>3proxy.exe /path/to/config.cfg
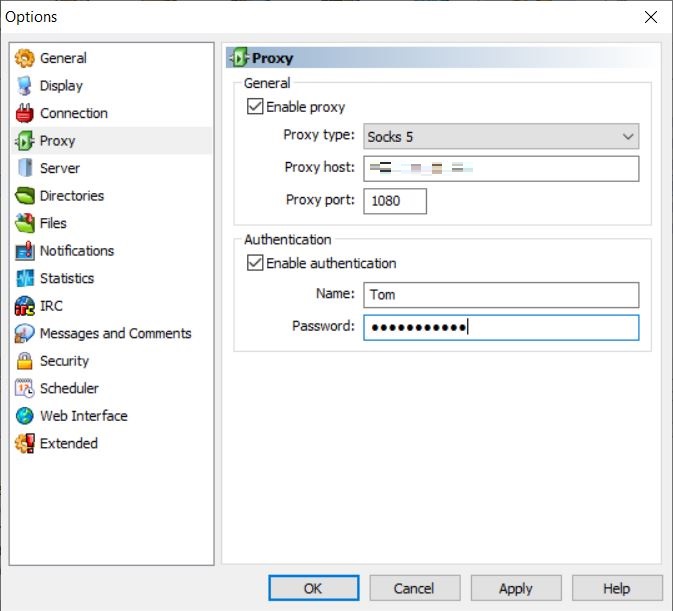
You need to configure proxy settings in the local eMule client:
Open eMule → Options → Proxy
Check Enable Proxy and select Proxy type: Socks 5
Enter the cloud host address and port 1080
Check Enable Authentication, enter the username and password set on the server, and save the settings
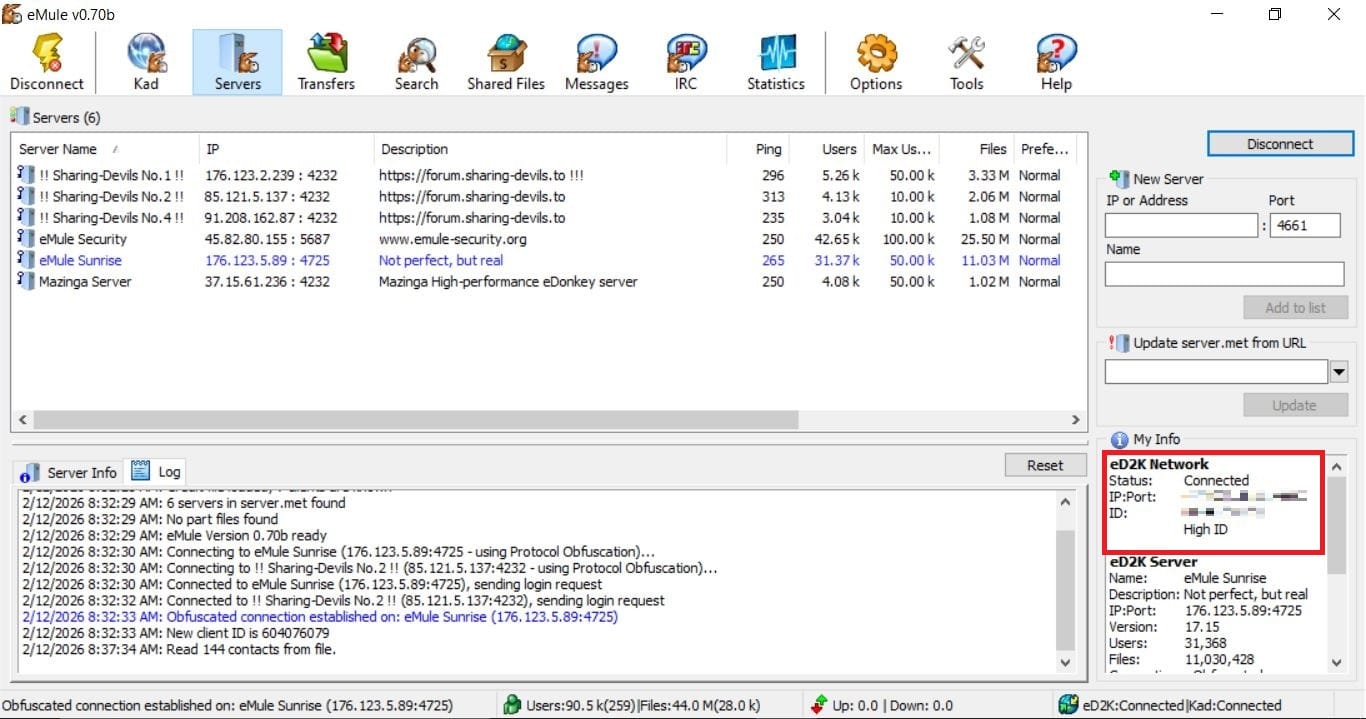
At this point, if you connect in Servers, you'll see that after connecting it shows High ID.
eD2K Network
Status: Connected
IP:Port:    47.120.1.36:4662
ID: 604076079
    High ID

eD2K Server
Name:   Mazinga Server
Description:    Mazinga High-performance eDonkey server
IP:Port:    37.15.61.236:4232
Version:    17.15
Users:  4,190
Files:  1,035,290
Connections:    Obfuscated
However, the local eMule still shows as Firewalled after connecting to the KAD network because 3proxy cannot proxy UDP traffic. At least now, sharing files on the eD2k network is working.
If you want eMule to send and receive all traffic using the cloud service IP and have the KAD node in an Opened state, you will need to use OpenVPN or WireGuard to connect to the cloud server via VPN.
One last thing to note is that cloud servers usually have security policies. You need to add TCP inbound permissions for ports 7000, 1080, and 4662, and UDP inbound permission for port 4672 on the cloud server control panel.
I used this High ID eMule to share a test file and generated an ed2k link. I then used another computer, running a Low ID eMule with a Firewalled Kad status, which is in poor condition, to test downloading this linked file. It worked, proving that it can transfer files to others on the ed2k network and appears in the known client list of the Low ID eMule.
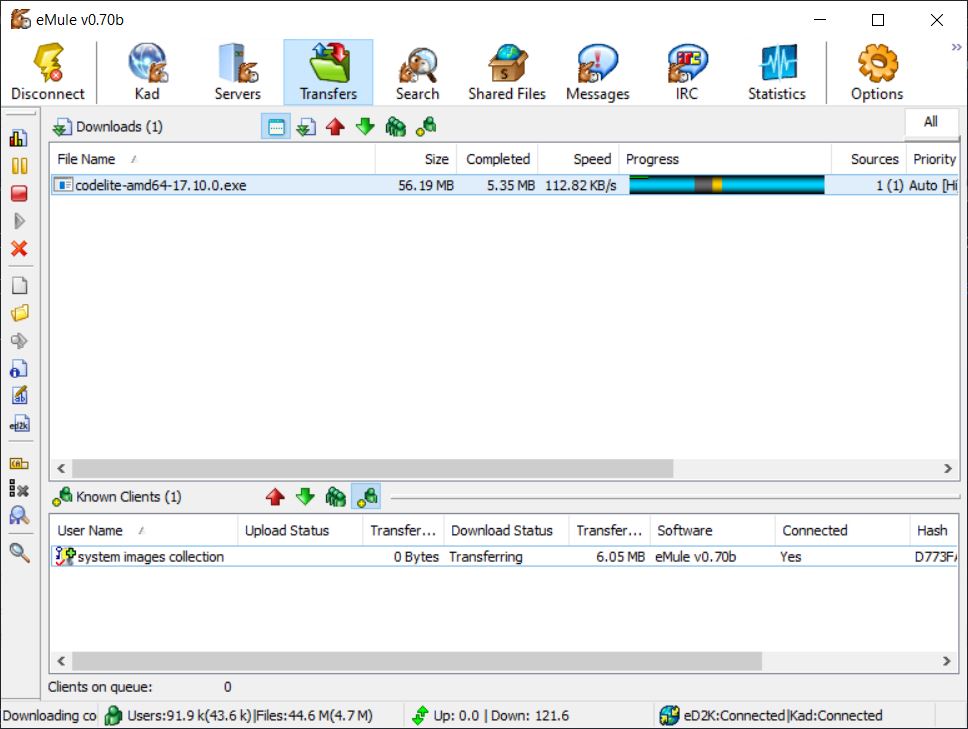
Because Kad is limited, discovering and peer-to-peer transferring files requires that they are connected to the same ed2k server.